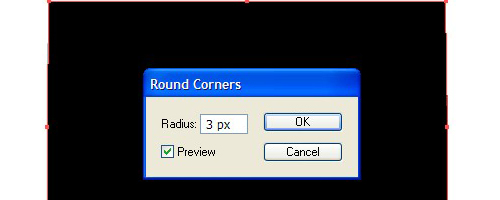
1. Open a new document, select the Rectangle tool (M) and create a rectangle with size 400x250px. Then apply Effect > Stylize Round Corners and set Radius: 3px. Click Ok and fill the rectangle with black color.

2. Create another rectangle using the Rectangle tool (M) with size of 400x240px. Fill it w
ith Linear gradient. For the first stop color slider, select black color and for the second one – dark grey color. Also, set Angle to 90 degrees.
ith Linear gradient. For the first stop color slider, select black color and for the second one – dark grey color. Also, set Angle to 90 degrees.

3. Copy the rectangle you’ve just created by Ctrl+C, followed by Ctrl+F. As the new copy is still selected, move it a few pixels down using the arrow keys on your keyboard. Pick the Selection tool (V) and decrease the size of the rectangle as you click on the upper middle point and slide it down. Pick the Direct Selection tool (A) and slide the two upper points of the rectangle inwards as it’s showed below. Now fill the rectangle with Linear gradient with colors from black to white and set the Angle to -90 degrees.


4. Select the Ellipse tool (L). Create a circle with size 14x14px and move it to the center at the bottom part of the rectangle you’ve created in Step 2. Fill it with Radial Gradient with colors from white to blue and position it behind the rectangle by clicking Object > Arrange > Send to Back.


5. Copy again the rectangle from Step 2 by Ctrl+C, followed by Ctrl+F. Pick the Pen tool (P) and create a shape like the one showed below. Select the copy of the rectangle and the shape you created earlier, open the Pathfinder panel and click on Minus Front. Fill the newly created shape with Linear Gradient and for the both stop color sliders you selected, choose white color. Then on the second slider reduce the Opacity to 0%.


6. While the shape you just filled in with white Linear gradient is still selected, go to Effect > Blur > Gaussian Blur and in the window which will open set Radius: 2px and click Ok.

7. Copy again the rectangle from Step 2 and position it over the highlight shape you just created in the previous step. Now, select both the shape and go to Object > Clipping mask >Make. This way will cover the traces from the Gaussian Blur which are outside the shape.

8. Again copy the rectangle from Step 2 and position it over all the other ones. Pick the Direct Selection tool (A) and remove the upper two points of the rectangle by clicking on one of the points and click the Delete key on your keyboard. Then select the other upper point and click the Delete key again. Now go to Window> Brush Libraries > Artistic > Artistic Ink and select Tapered Stroke with the following color: R=153 G=153 B=153 and Weight: 0,05pt.


9. Select the rectangle tool (M) and create a rectangle with sizes 355x200px. As the newly created rectangle is still selected, go to Object > Path> Offset Path and set Offset: -2px. Fill the new rectangle with Linear Gradient with colors Black to dark grey and set the Angle to 90%. Copy the newly created rectangle which you filled with Linear Gradient, using Ctrl+C followed by Ctrl+F. Pick the Pen tool (P) and create a shape like the one shown below. Now, select the shape you created earlier and the rectangle’s copy, open the Pathfinder panel and click on Minus Front. Now fill the new shape with Linear Gradient with colors from black to white and set Angle to 40 degrees. Open the Transparency panel and change Blending Mode from Normal to Screen.


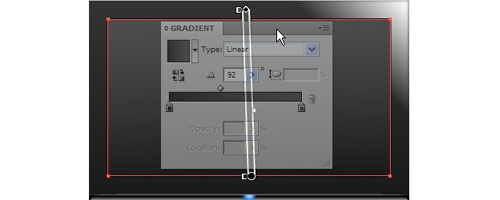
10. Create a rectangle with sizes 200x300px. As the rectangle is still selected, go to Effects > Stylize > Round Corners and set Radius: 10px and fill it with Linear Gradient. To do this, open the Gradient panel, using Ctrl/Cmd+F9 and select Linear for Type. Create a similar gradient stops as shown in the diagram below. Draw another rectangle a little bit wider from the previous one and position it as it’s shown on the picture below. Select the rectangle with the rounded corners which you created earlier. Open the Pathfinder panel and click on Minus Front.

11. Copy the newly created shape using Ctrl+C, followed by Ctrl+F. Flip it vertically, move it a few pixels up using the arrow keys on your keyboard. Then copy the last shape using Ctrl+C, followed by Ctrl+F. Pick the Rectangle tool (M), create a rectangle wider than the last one and position it as it’s showed on the picture bellow. Now select the rectangle and the copy of the last shape, open the Pathfinder panel, click on Minus Front. Fill it with Linear gradient and for the first stop color slider select white color, for the second one – also white color with Opacity: 0%.


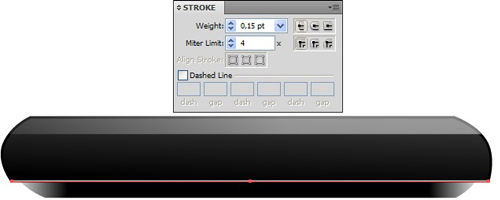
12. Pick the Pen tool (P) and create a line over the shape from the stand as it’s showed bellow using white stroke color and weight: 0,15pt.

13. Create a rectangle using the rectangle tool (M) with sizes 50x10px and position it as it’s showed on the picture below. Now, round the corners of the rectangle. To do this, go to Effect > Stylize > Round Corners and in the new opening window set Radius: 4px and click Ok. Fill the rectangle with Linear gradient as shown below.

14. Copy the previous rounded rectangle using Ctrl+C, followed by Ctrl+F. Move the new copy a few pixels up using the arrow keys on your keyboard and apply Stroke color: black and 1pt.

15. Select the last 2 shapes you created and group them using Ctrl+G. Copy the group using Ctrl+C, followed by Ctrl+F, flip the copy vertically, move it a few pixels down, open the Transparency panel and reduce the Opacity to 25%.

16. Select all the shapes you’ve created so far and group them using Ctrl+G.

17. Now, the only thing left to do is to add shadow and reflection. Pick the Ellipse tool (L) and create an ellipse with sizes 400x47px and white color. Pick the Mesh tool (U), click in the center of the ellipse and apply Fill color: black. Select the Selection tool (V), click once on the ellipse to select it, open the Transparency panel, reduce the Opacity to 30%. Also change the Blending mode from Normal to Multiply. Move the ellipse back behind all the other shapes. To do this, go to Object > Arrange> Send to Back and with this done our tutorial is finished.


0 nhận xét :
Post a Comment
▄▀▄▀▄▀▄ -HAHEINEKEN.BLOGSPOT.COM ▄▀▄▀▄▀▄
- viết một nhận xét nếu thấy bài nào có ích
HƯỚNG DẪN DOWNLOAD TRÊN ADF.LY:
- Bấm nút download, Đợi 5 giây
- Rồi bấm vào hoặc
ở góc trên bên phải.