


Learn how to create a couple of cute and simple kids illustrations of a car and airplane using Adobe Illustrator’s basic shapes. Take inspiration from hand crafted artwork to give each graphic a plaid effect fabric texture and stitching effect.


Start work by opening up Adobe Illustrator. Grab the ellipse tool and draw a large oval on the artboard.

With the direct selection tool, select and move the lower most point vertically. Hold Shift to constrain the axis.

Next, select each of the two Bezier curves from the bottom point, and extend them outwards to create a tighter curve on the two lower corners.

Draw another oval, this time smaller and size. Position it to the front of the car body.

Use the direct selection tool to manipulate the shape to blend into the main body.

With both shapes selected, merge them together with the Add to Shape Area option from the Pathfinder tool.

Elsewhere on the artboard, draw a small square and fill with a light green.

Copy (CMD+C) and paste in front (CMD+F) the square and fill the duplicate with a darker green. Go to Object > Transform > Scale, and enter 50% in the horizontal option under the Non-Uniform section.

Copy and paste a copy of this new graphic, then rotate it by 90 degrees. Lower the transparency of both pieces to 20%. This gives us the basic repeating swatch to create the plaid pattern effect.
Select the complete graphic, then drag it into the Swatches palette. Add this swatch as a fill to the main body shape.
Select the complete graphic, then drag it into the Swatches palette. Add this swatch as a fill to the main body shape.

If the pattern is too large or small in size, go to Object > Transform > Scale, and deselect the Objects checkbox. Adjust the scale percentage to alter the size of the pattern.

Add a 2pt stroke to the shape and give it a green colouring picked from the green tones of the pattern.

Draw another oval onto the artboard, and begin manipulating the shape to form the window.

Move the Bezier curves of each of the two side points upwards to reduce the size of the corners. Aim to leave a straight edge along the bottom.

Fill the window with a light blue, and give it a stroke of white.

Grab the ellipse tool once more and draw a range of concentric circles. The accuracy doesn’t matter too much, as the odd misalignment adds to the ‘craft’ theme of the design. Give each circle a fill, and add a dashed stroke to the centre circle by selecting the ‘Dashed Line’ option in the Stroke palette. Adjust the dash and gap options to suit.

Make two copies of these groups of circles, then position them as wheels on the car body.

Draw another oval onto the artboard and position at the front of the car. Make a copy of the overall body shape and use it as a tool along with the Intersect Shape Area option from the Pathfinder palette to crop out the excess, leaving a simple headlamp graphic.

At the rear, use the Pen tool to draw some wavy shapes. Make sure the Bezier curves are smooth enough to avoid any sharp angles. Add the dark grey dashed stroke used on the wheels.

Select the window graphic, then go to Object > Path > Offset Path. Enter -2mm in the options to create a duplicate path running parallel to the original.

Give this new path a dark blue dashed stroke. Use the line tool to draw a centre line, also with the same dashed stroke.

Repeat the process with the overall body graphic, creating another -2mm offset path. Add another dashed stroke, this time with the dark grey colouring.
There we have a cute little car, inspired by the simple styles as dreamed up by kids. The mix of textures gives the craft like feel, as if it has been cut and stitched together with fabrics and thread. Next up, we’ll use similar steps to create a super duper airplane!

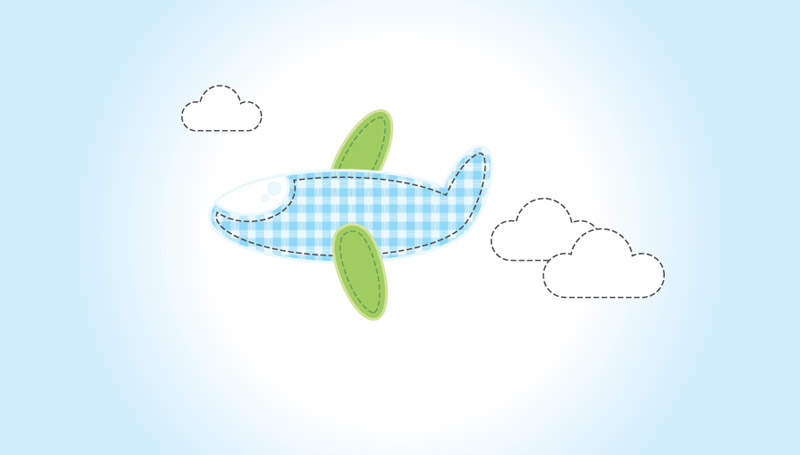
The airplane also starts off with a plain old oval. Use one large oval to form the main plane body, and a smaller oval as the tail fin.

Draw another repeating pattern to form the plaid style texture. This time start with a small blue square, then copy and paste in a duplicate. Fill the duplicate with a darker shade of blue, then scale horizontally by 50%. Duplicate this new graphic, set to 20% transparency and rotate by 90 degrees. Drag the whole graphic into the Swatches palette.

Merge the plane body with the tail fin by using the Add to Shape Area option from the Pathfinder palette, then add the blue plaid pattern fill. Make any adjustments by altering the Scale, remember to select just the pattern in the options. Add a light blue stroke at 2pt in size.

Draw an ellipse to fill the space of the cockpit window. Then select the main body graphic along with the new oval, and use the Subtract from Shape Area option from the Pathfinder palette to punch out the shape.

Switch out the default black stroke with a light blue, matching the outline of the plane body. Draw a couple of small circles to act as highlights on the window.

Select the plane body, then go to Object > Path > Offset path. Use the same -2mm option as before to create a new path running parallel to the original.

Add a dashed stroke to this new path to give the appearance of a stitched outline.

Elsewhere on the artboard, draw an ellipse and add a green fill and lighter green stroke. Use the Direct Selection Tool to adjust one of the side points to flatten out the curve.

Add an inner dashed stroke by creating another offset path. Fill this stroke with a dark green colour.

Move two copies of the ovals into place to represent the wings of the plane. Use the shortcut CMD+Shift+[ with the upper wing to alter the stacking order and send the wing graphic to the bottom, giving the impression that it’s behind the main body.
